Sunday 31 August 2014

A New 3DS?!

It has been a while but I have to say thing have been busy. Anyway, on to the topic at hand. After recently watching a video from GameXplain (check them out) it has been announced that a new handheld console will be released from Nintendo as a better, updated version of the 3DS. Now what do I think about this? WHAT IN THE WORLD NINTENDO?!?? That was basically my first reaction, not to mention that i had only recently purchased a 3DS of my own. Well, before going on I should at least mention the changes they have added to the new console. It's as standard as standard gets for the hardware, a better CPU and GPU so games run smoother (hopefully Pokemon will run at 60 fps with 3D on), load time are faster and, well and overall better experience for the user.

I'm just wondering why'd they move the start and select button
(courtesy of wikipedia)

In the video they also hinted that the new 3DS will have better 3D. Now, this raised a few questions in my head. How did they improve the 3D? Did they add the eye detection technology I first saw implemented in the Toshiba Qosmio F755? If they had added this technology, then playing with 3D on will almost never result in double images or at least if the system can detect your eyes. Aside from that, some of the bigger changes would be the repositioned "Start" and "Select" button, an additional circle pad but smaller, and 2 extra buttons, ZR and ZL. This highly suggests that they are opening up the console to wider variety of games, especially shooters, since a single analog stick isn't exactly optimal. But where does that leave the older 3DS and 3DS XL? Nintendo does seem to be very careful about allowing their consoles to be backwards compatible, but after just recently releasing the 2DS, I seriously thought the 3DS would not be getting a hardware improvement any time soon.


Watch the video first before continuing.

Done? Ok, my main concern about this is, since they have the newly added buttons, most new games will utilize those buttons, leaving them unplayable on the older 3DS. A similar case happened during the transition from the DS to the DSi. A little back story, the original Nintendo DS was launched in late 2004. While the Nintendo DS lite was released about a year later, no major change in hardware was made, it was merely a thinner, lighter and mostly less bulky DS. It was only after 3 years that the DSi was launched, with new hardware such as the camera and also internal storage in the form of an SD card. Most games utilized the camera and the added storage in the system. Sure they still released games for the original DS but only a fraction of the total games, and what developer would go for weaker hardware? Well, what I have mentioned are just a few of the features added. Other features are, NFC (near field communication), storage slots for both SD and microSD, and if you see the picture up top, coloured A,B,X,Y buttons, but I'm not going to cover them all.

Basically the point of my post (rant) is has the 3DS reached its limit? I mean the DSi had 2 solid years before the 3DS was released, and Nintendo had just released the 2DS. And if so, why not make this out to be a complete new one, not just updated hardware and a few extra buttons. Replace that resistive touch screen with a capacitive one, a 3 MP camera at least, I mean phones for less than RM 500 have cameras with better quality (compared to those 0.3 MP ones on the 3DS).


It has barely been a year for the 2DS
(courtesy of wikipedia)

I have to admit, and maybe you have noticed, that even though I am angry at the decision to launch a new version of the console after the 2DS, I like the new features added. Faster loading times and a better CPU and GPU, I'll accept them with open arms, but not this early. I seriously thought that this would have at least a year and a half left before the announcement. And like the points mentioned in Rich of ReviewTechUSA's video, it does seem like Nintendo is doubting their decision of the 3DS' hardware in the first place. Lastly, its sad that eventually, I'm going to have to buy the new 3DS if I want to keep up with the games, so my 3DS XL won't have the as long as I thought it would.


Farid :(

Tuesday 10 June 2014

There's a first time for everything!

What do you mean Farid? What have you tried new for the first time? Excellent question dear reader of my blog, which I have not updated for the past month. So to answer the burning question in your minds, I have built my first Zaku gundam model!! Yeah, break out the confetti and them unhealthy drinks, because finally, I have completed one of the requirements (self-made) of my gunpla fan must build! Some of you guys might say, "Hey, what about that SD Zaku II you built a while ago?". Well, for me SD models don't really count, because of the noticeably less parts they have as well as how simple they usually are, so they are a lot of fun, but that was just a guinea pig for painting techniques or whatever new things I want to try. Another new thing I will try for this is how I post about my gundam models, in a certain format, and every other model I post here will be posted in a similar fashion, just so things look more organized. So on to the topic at-hand!


The model I built was actually something as close (at least in my eyes) to the original Zaku II I could find, the HG MS-06FZ Zaku II FZ is the model I went with in this build of mine. Just to throw this out before I post any further, this might be one of the messiest paint job I had done, mainly because it has been a while since I did a fully painted model. I was relatively pleased with how the model was meant to be put together, the articulations as well as the detail on the model. But there were a few gripes I had with certain design aspects, which gladly aren't completely implemented into newer cyclops models. The first one, and also my biggest gripe was the power cables for the Zaku. Sadly, this model uses solid cables, not the flexible kind which are implemented in newer models, as well as a not so solid mounting method on to certain parts, but you might find the most trouble with the power cables on the legs since those face a lot of movement. The second gripe would be the non-movable eye for the Zaku. I did manage to find a way around this, since the sticker for the eye can be taken off and placed back on in a different position, which I think was how the model's eye would be adjusted for certain poses. But it does annoy me that its not easy to pose the model without having tweezers nearby. Everything else was either happily accepted, such as the separable limbs, allowing me to easily paint those separate parts, and others were not really a problem.

This model was kind of a guinea pig as well, my first model partially painted with Tamiya Acrylic paint. I have tried painting a few parts using Tamiya Acrylic paint, such as a few small parts or even weapons for some of my gundam models. And during those projects, not sure whether it was how inexperienced I was at the time, turned out beautifully. However, while painting big parts, like an entire leg or shield, I finally saw a few major flaws, one, they do not turn out as smooth as my paint jobs using Tamiya Enamel Paint. Two, you can't use the thinner to easily clean up bad paint jobs, the paint turns into a pile of sticky goo. Whereas when using Tamiya Enamel Paint, you can very easily rub off the paint using its thinner. Sometimes too easy that if you get some on your fingers, you'll rub off the paint while handling the model if you're not careful. However, Tamiya Acrylic Paint dries extremely quick, as well as requires a very thin layer of paint for it to cover the previous colour, so those are the benefits of using this kind of paint.


The colours/colour mixtures used :

Brown used on the arm and legs : Tamiya Acrylic Brown

Lighter tone of brown used on arms and legs : Tamiya Enamel Medium Grey

Darker brown used on the body : Tamiya Enamel Flat Brown

Joints, power cable shading and back pack : Tamiya Enamel Dark Grey

Thrusters : Tamiya Enamel Chrome Silver

Innner part of the Thrusters on the back pack : Tamiya Enamel Gun Metal Grey

Black on the feet, chest area and knee guards : Tamiya Enamel Flat Black (3 parts) 
                                                                       Tamiya Enamel Flat White (2 parts)

Grenades on hip armour : Tamiya Enamel Flat Red and Tamiya Enamel Gun Metal Grey.


This is actually my first try doing a camo-ish paint job for my gundam model. At first, this was because of the failed attempt trying to paint on digital disruptive patterns (DDPAT or digit camo) on the majority of the brown parts. However, I tried to make it work, and well, I'm quite pleased with the result. Note that Enamel paint doesn't stick too well on Acrylic, well at least Tamiya's Acrylic Paint using my method of painting. The camo method was done basically covering one part with masking tape, and since it is simply a two tone look, not much precision cutting was required.


The rifle took quite a lot of my time to paint as well, since there were 4 different parts to complete the rifle. The rifle was basically painted Tamiya Enamel Dark Grey, with the barrels as well as some metal parts highlighted using Tamiya Enamel Chrome Silver and Tamiya Enamel Gun Metal Grey. The ammo clip as well as certain parts of the muzzle was painted Tamiya Enamel Flat Black.


One of the worst mistakes I had made. As you can see in the above picture, you can see an "L" written down on the foot. This was basically so that I could know which foot was which but the layer of paint I applied was too this to cover it up completely... *sigh* *weeps slowly*


In the above picture you can see that the power cable was roughly glued and just put in place. Basically a way to remind myself not to continuously assemble and disassemble parts just to make sure they "look okay". *weeps again* The brown weathering was not expected, and I'm not really sure how that got there, but it looks okay to me, a little surprise!


Well, that's pretty much all I have to say about this model. If you want a Zaku II to try and build for the first time, I would recommend the original HG Zaku II, or any other Zaku model which the eye is movable. If you're a little bit more experienced, the RG Zaku II is an amazing kit to put together with all the different shaded parts and looks beautiful even as a straight build. That is all, finish!!


Farid

Saturday 1 March 2014

The Mikoyan Foxbat!


(Above) THE! MIKOYAN!... errr, Gurevich? Hmmm, let me check again...

First and foremost, this is not referring to the Mikoyan Gurevich, a Russian aircraft, but a gaming mouse from Armaggeddon. The Mikoyan Foxbat (Foxbat being the NATO reporting name of the aforementioned aircraft, "Hmmm, I see a connection") was actually the gaming mouse of my choice while I was picking a gaming mouse in the store but decided not to. Anyhow, my friend had recently purchased one, and taking the opportunity, I asked to borrow it for a while and review the mouse.


(Above) THE! MIKOYAN! FOXBAT!! *cheers and throws confetti*

And here we are, introduction aside, let's get to it. The mouse like most of Armaggeddon's medium and above price class is a nice matte black colour covered with a soft touch feel. As I had stated earlier, having the soft touch feel on a gaming mouse makes it many time more comfortable to hold and, well, it just feels premium, and you can't shrug the feeling of how sturdy the mouse is while you game for those long hours. The mouse features an ambidextrous design, well, almost ambidextrous, as there are two thumb buttons on the right side of the mouse, which would most likely be utilised by right handed gamers (or people who want to buy a gaming mouse but doesn't game, not judging). The Mikoyan Foxbat also has multiple LED lit areas on the sides of the mouse as well as a few accents on the top, making it really stand out. However, the LEDs are only available in the colours you purchase the mouse in, and the only customization you can do other than setting up macro profiles for each button would be changing the light intensity (a fancy term for making them bright or dim) and breathing effects (having them slow, medium, none existent, etc.) not really adding to the value.


(Above) Very nice LED lights on the mouse, helps it stand out amongst the others, or just mouse without LED lights.

But how does it handle gaming as its primary task, very well actually. A while ago I reviewed the Aquila-X entry-level gaming mouse from Armaggeddon as well. The Mikoyan Foxbat is, however, on a completely different level from the Aquila, the added thumb buttons as well as the smoothness and responsiveness of the mouse in game. I noticed this greatly when you play games like Counter Strike Global Offensive, were having that precision as well and smoothness is required. While not quite as noticeable in RTS game like Starcraft II or Dota 2, it is a better overall experience. The buttons are clicky, having a nice feel when mashing away on the buttons as you order your hero around in Dota 2. But having the thumb buttons means the mouse is aiming for more FPS players instead of the RTS players where you can simply macro the thumb buttons for grenade throws or quick knife switches, and this mouse excels just at that.


(Above) Left to right, top to bottom, lowest CPI setting to highest CPI setting (400, 800, 1600, 3200)

Another added feature this mouse brings with it is the capability to add or remove weights from the mouse. As it comes included with 9 weights and a small chamber at the back of the mouse accessible via turn to open cap which, although doesn't just pop off, is fairly easy to remove (thank gravity for that). The weights are inserted into a soft foam piece with the holes that fit the weights snugly.


(Above) Weights are adjustable for overall or more focus on back, left, right or front positioning as well.

The mouse comes with a CD to install the needed drivers as well as software to change lighting effects, intensity, CPI and macro, which is also available on their website for download.


(Above) The thumb buttons, very nicely placed as you can very easily press them if you want to but while moving the mouse for aiming or stuff like that, you don't accidentally press them.


(Above) A braided cable as well as gold plated USB connections are a must have, and this mouse like most other also has them.

What do I think of this mouse? Well, its hard to say as I clearly have a small bias (it was one of my picks), but I can clearly say this, it's one of the best choices for the asking price RM 130. But its not for those who want a more comfortable design. I'm not saying the mouse is uncomfortable, but there are other available most with a much better ergonomic structure (basically non-ambidextrous mice). However, if you're going for ergonomic designed gaming mice, consider this mouse as a viable option. If you're on a tight budget, and looking for a mid-range mouse, this is the mouse to go for.


Farid

Thursday 6 February 2014

Back in Black....Light Retribution!

It has been a while since I have updated this blog, that is because I was on holiday. I know, I should be able to update more during the holidays, but I wanted a more relaxed time, so skipped the updates on my blog. Anyways, back to the topic at hand, which I have yet to explain or elaborate on, which is a game I have played for quite a while and stopped because of some technical issues and then hopped back in.


And I have to say that the issues I had were pretty annoying, the game not updating, taking forever to verify the client, and also minor issues with Punkbuster, the software used to connect players online in Blacklight Retribution. As the title of this post explains, I did start playing Blacklight again after managing to solve these issues. How you ask? Painfully having to uninstall the game and re-download the whole installer. Yeah, that took a while, but that's how much I liked Blacklight.

Moving on, this post might get a bit technical, but the main reason why I decided to post this was the changes they had added to Blacklight, both in terms of content and optimization of the game. Just to give you a perspective of my gaming rig, or more honestly speaking, my laptop, here are the specs :

Intel Core i5-3210M
Nvidia Geforce GT 650M with 2GB of dedicated VRAM (and no there is no "X" after GT, I checked the official site)
8 GB of 1600 MHz RAM
750 GB HDD

and last of all, the screen resolution that I am playing on is 1366x768, a little bit better than 720p.

This doesn't sound like much, its more of a high medium class gaming computer (barely up to the level of most of you guys with dedicated hardware), and I know guys out there with much much better computer, with their overclocked CPU, GPU and in some rare cases RAM, with an SSD for running games. However, after I had reinstalled Blacklight, about a few months ago, I played around with the settings and fine tuned it for the best gameplay experience. Then, just out of curiosity, I decided to run fraps in the background and see just how the framerate was at the "best gameplay experience" settings. It was fluctuating at a steady 100 to 140 FPS! I was shocked, and no it wasn't just guys running around shooting each other, even in stages where guys were spamming Brimstone Airstrike and having up to 5 Hardsuits blasting each other with their guns, plus a few guys firing at us with Armour Stingers. So then I wondered, how far could I push my hardware.

First things first, why was this such a shocker to me? Well, the year before, I played Blacklight on higher settings, and found that the average FPS I was getting out, even at these low settings was about 40 to 50 FPS, and after enabling things like DX11, ambient occlusion, light shafts and motion blur with a small 2x Antialiasing, the frame rate dropped to just slightly playable, 25 to 30, tops was 38, and Brimstone Airstrikes didn't really affect and cause a substantial drop in FPS. And after exiting the game, my computer would just lag and stutter for a few minutes. Initially, the problem was I had too little RAM, how much? 4 GB, just enough. I added on an additional 4 GB of RAM just so that I could multi-task my applications more, and that pretty much solved the huge lag after leaving the game (note that this shows 4 GB is going to become barely enough for newer games in the future).


(Above) The initial settings I ran on to get smooth gameplay. However, the frame rate was high it produced tearing, but nonetheless, smooth gameplay.


(Above) The settings I currently run on, still smooth gameplay experience, what more could I ask for... ok maybe a higher resolution.


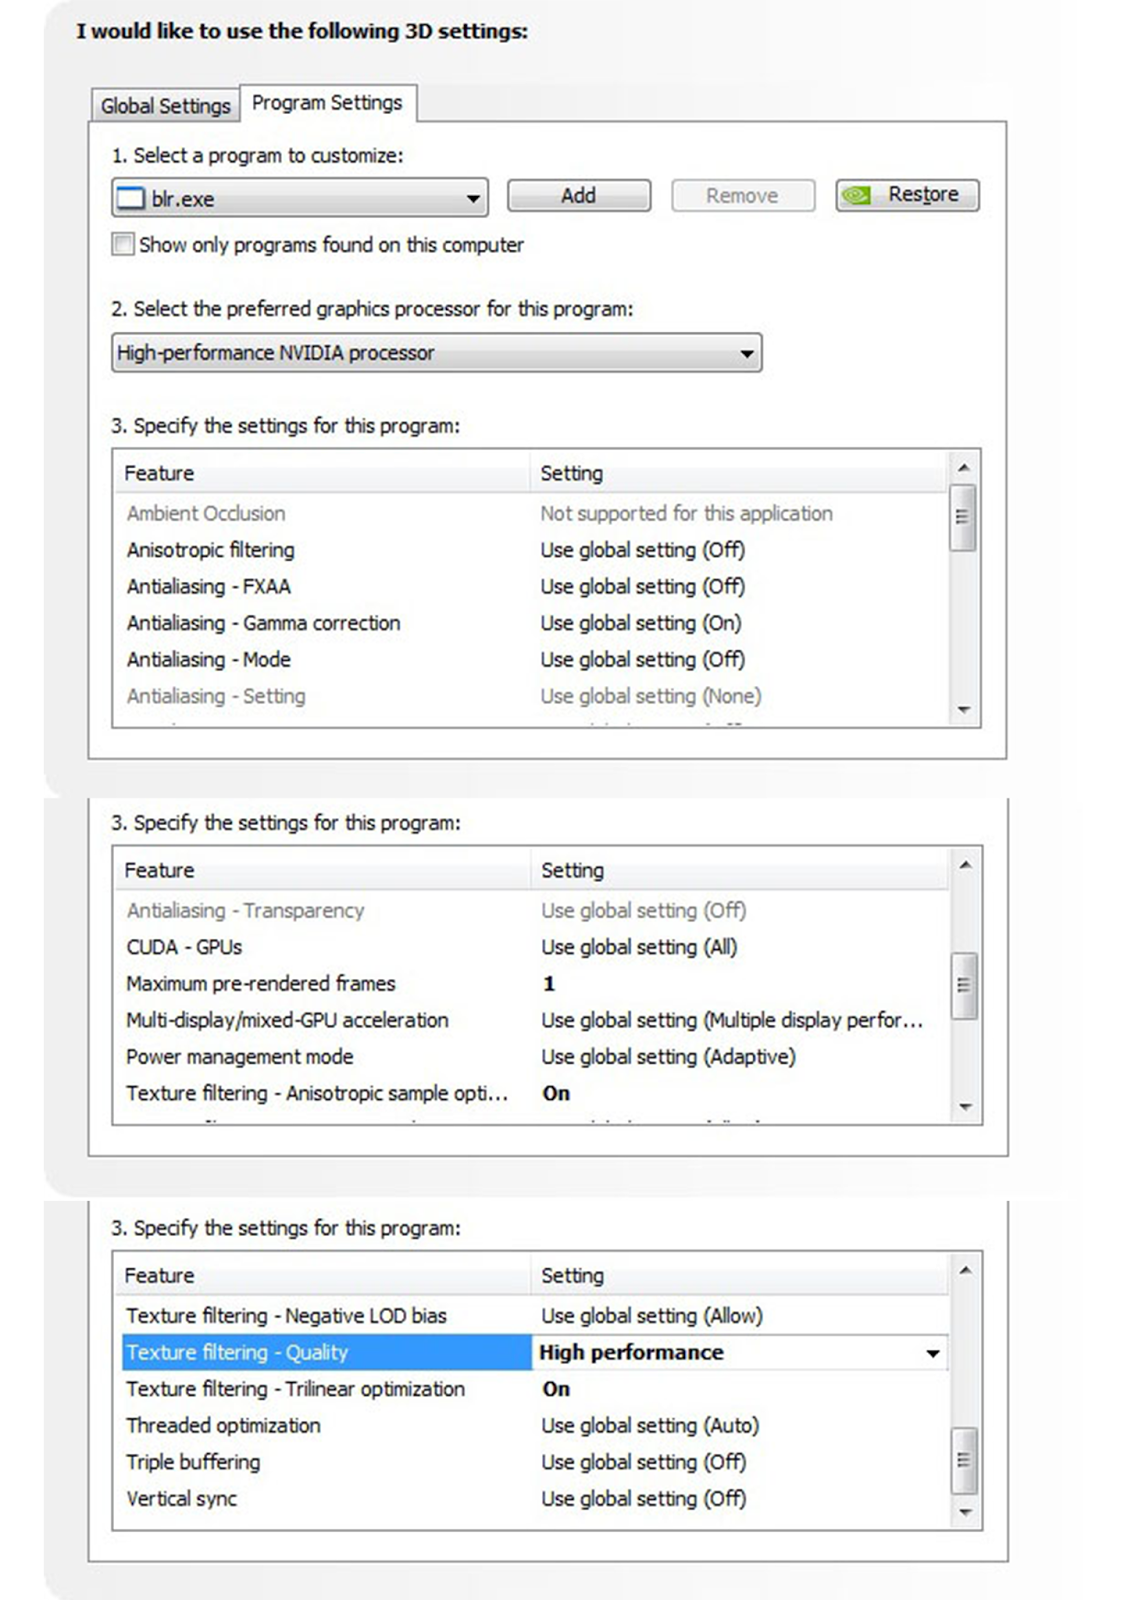
(Above) Nvidia Control Center settings I used for the game. Left is best performance, right is my current settings for the best performance with best possible graphical beauty.


And after playing Blacklight again, I start to wonder, why such the giant leap from barely playable to smooth in about a year. Well, you guys might say, better optimization on Zombie Studio's part or better drivers on Nvidia's part, but I started thinking, and now we are back to the aforementioned, how far could I push the hardware I have.


(Above) Gameplay footage, need I say more?

To start off, I slowly enabled more settings, seeing how much of a drop in frame rate I got after the change in each setting, but mostly, light shafts and ambient occlusion (both in game settings not on the Nvidia driver, I'll get to that later) eat the most performance out of my computer. Meaning after enabling those 2, I have about 70-80 FPS, however, these were running on DX9, after enabling DX11, and basically maxing out everything, from world detail, character detail, to setting tessellation to max, the frame rate stayed at about 70-80. Not bad, not bad at all, but now on the Nvidia driver side, just to squeeze out a little bit more juice out of my system, the previously texture settings which was set to High Performance, was changed back to Quality, also changed anistropic filtering to 4x and antialiasing to 4x, just to smooth those out the look of the game, and the game still ran at 50-60 frames. This was good, I did not have to enable vertical sync because the refresh rate was basically almost identical to my screen's refresh rate, 60 Hz, and thus no tearing. The lowest drop in FPS I could obtain was by moving my mouse around really fast, the FPS dropped to 40 FPS, and that was still acceptable, since I had been playing at around that frame rate when I started.

What am I trying to say? This is a good thing, better optimization (this is running Nvidia, I didn't have the opportunity to test out AMD based systems) lets this game run better, but also would allow people who started out at unplayable might get a chance to play it now. A few tips if your computer doesn't have a dedicated GPU, just change you integrated graphics settings to High Performance instead of Quality, and slowly increase it until you get your comfortable frame rate.


Farid

Friday 24 January 2014

Project Nimbus on Kickstarter!


I actually came by this game by accident, and a happy accident that is! The name of the game is Project Nimbus, by KISS Ltd. from Phuket, Thailand. Now Project Nimbus was one of those games I really wanted available for the PC. Some of you readers of this post might think, "Oh, why always wait for games to come to the PC, why not get a console and play those games?!". Well a simple answer to that is I want to play as big of a game library as I can one a single (well, ok, two, because I have a 3DS) platform, the PC, and the fact that I picked the specs on my laptop so that at the very least they can support those games (they can and I am thankful). Basically, I'm trying to get the most value out of all the money spent.


Ok, back to the game. Project Nimbus looks a lot like the Armored Core franchise in combat style as you view your mech from a third-person's point of view, which is how I like it. And as I read through the descriptions of the game from the developers themselves, this game will be featuring a single player mode where you can explore the story and the universe brought to you by the game. The mechs are humanoid, and the design is, well, more towards anime or japanese if I can categorize the design style, since most mechs from american or english movies tend to be more realistic in design. And I don't have a problem with that. While I like the fact that the action in the game looks fast-paced and guns blazing, all the action takes place in the skies. I watched some of the demo gameplay videos on the Official Site for Porject Nimbus, and its looks fast, snappy, but in terms of sound, it lacks a little bit, however it is an early demo of the game, so hopefully they will improve on that aspect.


(Above) A little bit of demo gameplay for ya!

One of the main features I hope they add is deep customization for the mechs that you will use, and also a multiplayer mode which would be sweet. As some of you might know, I play Hawken, a first-person mech shooter, but Project Nimbus is nothing like Hawken since its major aspect is aerial combat, whereas Hawken is more of a land based shooter. And in graphical sense, Hawken was made more of a cinematic master piece, whereas Project Nimbus seems to be not up to that level, but that just graphics and both games are using the every popular Unreal Engine. I'm not sure whether I would still enjoy Hawken the same way as my main reason for playing it was because such mech games are rare on the PC, some of the only available ones would be Mech Warrior Online, which I don't quite fancy and Front Mission Evolved which I had high hopes for, but after playing it, didn't like it at all. Project Nimbus falls more into what I like to have in a mech shooter, third person view and fast paced action, and I await its release!

Link to the Kickstarter Page! (Support it if you like it!)


Farid

Monday 6 January 2014

MG Heavy Arms Custom, I thought you were blue?

I has been a while since I updated this blog on anything Gunpla related, but I have been busy, and building Gundam models takes up a lot of time. But anyways, I have recently finished building a Master Grade model, something I've always been excited about. The model I am talking about is Gundam Heavy Arms Custom, which you also know by the title.

Now, I had my fair share of surprises while building this model, which I will share with you further in this post. One of the very first surprise was that no stickers were prescribed for this model (just felt like using that word, not sure whether it works here). That's right, the 4 small lines on the chest of this model are separately molded in blue for the chest area. For me, this was something I appreciated a lot, since I don't really like (okay, I HATE) using stickers. And the fact that these parts were separately molded makes the model look absolutely more cleanly built than it would ever be if the parts were coloured using stickers, or painted on. While some maybe argue that a paint job using an airbrush and well placed masking tapes, even those guys would be thankful for these separately molded parts.


Another slightly unpleasant surprise was that I thought no painting or stickers were required to completely straight build this model (aside from the eyes and head sensors that is), but there were parts which required painting, and for this model, it so happened to be the missile packs and the missile pods themselves. Yup, count them, count them all, and those, need painting.


As you can see in the pictures above, the missile pods, all of them, which are the lighter tone of grey, and the middle section of the missile packs on the legs, which is grey are all painted. This surprised me a lot actually, as they could mold the blue lines on the chest separately, why they didn't do the same for all these missiles. However, I enjoyed painting them, and if I do say so myself, the contrast of the light toned missile pods make the model look quite nice, and stand out more. In the sample model on the box and the manual, the missiles are painted a lighter tone of grey, much lighter than my model, but I think it looks fine.


Another surprise I was faced with, this one a good one, was how solid most parts feel after they are assembled. As you can see in some of the picture above, the model has many parts that open up to reveal the missile pods inside, and these parts are just as solid. Props to Bandai for this.


One of the problems I have faced though is the knife that is supposed to be a last resort weapon, I mean, this is not the weapon to use as a main, and on the left pic, you can clearly see the knife not being able to fold completely if the arm is straight, though not really to noticeable (*eye twitches*), I wish they made it easier for the model to hold. 


In the picture above are the only removable weapons and items that come with the model, to remove the other weapons or armaments, you'd have to basically remove the gundam models armour. The main highlight, THAT, HUGE, GATLING GUN!!


The gatling gun and the ammunition pack both have 2 teeth that are used to house them on the back of the gundam.


Those lines are where the teeth hook on to.


(Above) Like so~


(Above) This is the model fully equipped with all armaments and weapons.


When trying to pose the model while holding the gatling gun, the fixed hands really help with how stable and firm of a grip the model can provide. However, it is quite hard to equip it to the model.


Thankfully, the gatling gun in the hand is very stable. But after a few times having the model hold the gun, I did realize the hand become a bit loose.


Armaments all ready to fire!!! I try to imagine how scary this would look as some enemy mobile suits try to rush and attack Heavyarms and he goes out guns blazing and missile pods firing. 


I was extremely happy with this model, everything felt solid, a slight weight to them. The articulations for the arms and legs are just good enough, however, much much better than that of the MG Unicorn Gundam if any of you readers have purchased and put together the model. An almost full 180 degrees for both the arms and legs.


And last of all, you can see Trowa Barton in the cockpit. What puzzles me is how noisy it must be in the cockpit, unless some kind of noise dampening system is used to silence the chest machine guns. And that is all, finish!


Farid