A pre-post before I actually talk about the Alien G9X Gaming Mouse. I tried posting about gaming mice, my Mikoyan Foxbat post got quite a few views (sorry, I didn't reply to the comments), so I have to try and explain the features or lack thereof of the mouse I'm talking about as much as possible. While, I don't really say it's a review, it is somewhat of a review of the mouse, and I'll just try cover as much as I can.
This post was again long overdue, but this time I did it on purpose. While, the other gaming mice I talked about were only used for a short period of time (barely reaching a year), I was actually given this mouse for my birthday present, in 2014. After using it for a year, I thought I would post my thoughts on the gaming mouse on my blog, however, it has been 2 years and I'm finally talking about it.
(Above) The Alien G9X gaming mouse in its packaging! Really sweet looking by the way.
(Above) What you get in the box (aside from the mouse), Top-left is the weights for the weight management system, Top-right is the disc which contains the driver (just download it online), Bottom-left, are an extra set of teflon feet for the mouse (very nice!) and the instruction manual on the Bottom-right.
(Above) The mouse from all four angles. In the Bottom-left photo, the black part is actually a button you press to access the weight management system.
This gaming mouse is Armaggeddon's medium price range gaming mouse, and similarly (from browsing the samples provided in the shop), it is covered in a nice soft touch feel with a matte black and dark grey colour scheme. Only the lower part of the mouse is covered in a textured semi-gloss finish. The model actually comes with two other colour options, the matte black and dark blue with blue lighting and matte black and yellow with blue lighting (looks good, but hard to match your set up with). The other models available come with the matte black and grey colour scheme with different lighting colours (red, blue, green and white which was what I got). The mouse is extremely comfortable with the extra click button, allowing a place for your ring and pinky finger. This did affect my gaming a little, but most of the time you get used to the mouse you game with, making them less uncomfortable over time.
While the design and colour scheme does seem a bit toned down compared to the Mikoyan Foxbat, simpler designs tend to look better in their own way, as well as match up with your gaming station (if that matters to you that is). The buttons are very clicky, and give a distinct sound when clicked, and they don't require too much force in my opinion. The only button I had a problem with was the scroll wheel which for me was a but too hard to press, that might be just for me however. Lastly, the cable is braided, so you don't have to worry too much about cats nibbling on the cable.
Now, I don't know about your taste for gaming mouse designs, but for me, this mouse just looks awesome, with its edgy and non-ambidextrous design (not that I have anything against left-handed people). But what actually made me want to buy the gaming mouse was that third click (which is set to nothing if I'm not mistaken). At that time I was quite into Blacklight Retribution, so always pressing shift would make my ring finger feel really uncomfortable. I then planned to bind shift to the third click, which while handy for gaming would make pressing more buttons in software like Adobe Photoshop and Illustrator simpler.
(Above) And now, lit up like a cherry tree! Errr... if the cherries were white and... ummm... nevermind...
The lighting on this guy looks awesome! I mean you can see why Armaggeddon has the guts to display these guys on a shelf fully lit, they're bound to turn heads! While that little spot of light bleed on the third click did trigger my OCD a bit... it might be just my model. The CPI indicator has four different levels which light up according to the CPI level. The CPI levels are 400 (1 light), 800 (2 lights), 1600 (3 lights), 3200 (4 lights), 4800 (all 4 lights flash then stay on) and 6400 (all 4 lights flash twice then stay on). Although it does go all the way up to 6400, I never used it past 1600, so I can't comment on the accuracy of the mouse on those levels but I can say from 400 to 1600, it was pretty accurate, didn't notice any problems with the tracking.
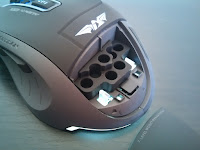
(Above) Similar to the Mikoyan Foxbat, this mouse comes with a customizable weight management system, with 7 different levels.
(Above) Completely empty, partially filled and fullhouse, just the way I like it.
Okay, I know I have yet to talk about it's performance as a gaming mouse. So let's get to it. Can it run Crysis? Don't be silly... As a mouse, a gaming mouse to be exact, it handles games just fine, I mean I had 2 years testing this guy as my main mouse. Throughout all the games I played in those 2 years, Dota 2, CS:GO, Starcraft 2 (the Legacy of the Void Campaign and online multiplayer), Insaniquarium Deluxe (don't judge me man), Hawken, Tom Clancy's Splinter Cell Blacklist, and many, many more games, this mouse didn't have any problems tracking as well as no stuttering (however, it started stuttering and jumping a lot in the beginning of the second year, could be my model and handling). I do feel this mouse is more appropriate for first-person shooter games (the better grip does allow for better control), like CS:GO or Blacklight Retribution, but just like any gaming mouse, it should handle all sorts of games.


(Above) The layout for the included software to control lighting, profile switching, and lots more.
I tried my best to play around with the included software to customize some of the buttons for the mouse. This software is also where you change light intensity and breathing effect speed (or just leave it on). However, I realized that even when setting it to be on all the time, the breathing speed is with just really long with a really short "breath out, breath in". This was extremely apparent in a dark room. What was also extremely apparent in a dark room was the amount of light bleed the lighting spots have, the only exception being the CPI level indicator. The software interface, which I think was supposed to look edgy and cool, turned out looking a bit weird in my opinion, nothing sleek. The main problem I had with it was how sluggish it felt changing anything in the software. It was quite apparent to see the delay between switching an effect (like light intensity) and seeing the mouse change its settings. And how did using the third click as the shift key turn out? Well, I basically switched the third click to the thumb up button or mouse 4, which I then bound to sprint in all my games. And it was a lot more comfortable (although awkward at first, your ring finger rarely does anything on a mouse), so no shift key replacement for now.
So what do I think about this mouse I have been using for 2 years. Well, with anything you spend a really long time with, you start to notice the minor flaws. Here are some I had with my model. The mouse started jumping or twitching in the beginning of the second year, the software sometimes failed to detect the mouse (hence you can't change any of the settings until it detects the mouse), which at first I thought was my USB connector, but then as I tested it with a pendrive worked without any problems. I plugged in the mouse again and it still had problems detecting. The soft-feel material started peeling off, which is a common problem with most mice, but the slightly sticky feeling of the mouse did not make it as comfortable to hold (still okay for gaming though). And the weight management enclosure became significantly harder to open after a while (it no longer works now, I have to pry it open). However, all these I suspect are due to the age of the mouse, as well as the stress I put it through, from tossing it into my luggage when I travel, as well as intense gaming and raging. The main point was about how the sensor on the mouse was affected, as that matters the most in a mouse. You need it to be accurate, especially when your work requires precision. And the jumping and twitching did hinder my performance, from missing a crucial shot in CS:GO (clutch situation, retaking B site and two enemies) and also messing my tracing work in Adobe Illustrator using the pen-tool. I suppose I could use the mouse's age as a reason for the failing sensor, but how long should a mouse work before its parts start to fail, and which parts should fail first before others.
In my opinion, this mouse is a nice product for what it offers. Major points for the mouse are its comfort, weight management and sturdy yet edgy design. But after two years of use, it seems to have broken down under the stress and pressure of someone who games barely at the level of a pro gamer.
JIM-san


